- Por sensores WF
Lab equipment calibration is the foundation of good research and testing. Integrating high-precision pressure sensors strengthens instruments that rely on gas or liquid pressure—think autoclaves, liquid handling systems and pressure gauges. This article draws on modern sensor subsystem features (integrated amplifiers, ADCs, digital signal processing and factory calibration data) to present practical calibration approaches that balance efficiency with measurement trustworthiness.
Catalogar
1. Why use high-precision pressure sensors to calibrate lab equipment
The main value of high-precision pressure sensors in calibration is steady, repeatable reference readings. Many lab instruments depend directly on pressure parameters; their performance tracks pressure closely. Bringing a high-precision sensor into the calibration workflow enables real-time monitoring and accurate comparison, cutting down on operator reading errors and making results more consistent. For regulated sectors and research labs, that means better data quality, lower compliance risk and stronger confidence in test outcomes.
1.1 Key calibration metrics and goals
When you run a calibration, it’s vital to set clear targets for accuracy, tolerance and repeatability. The sensor must meet the required accuracy and stay stable across the working temperature range. Using a low-error pressure sensor as the reference helps you spot device drift faster and apply adjustments so subsequent tests remain valid and comparable.

2. Choosing the right sensor: specs and package trade-offs
Pick sensors based on accuracy, resolution, temperature drift, frequency response and long-term stability. For demanding calibration jobs, favour devices with 16-bit resolution, low non-linearity and factory multi-point calibration. Package style—metal can with a pressure port or an LGA surface-mount—affects how easy the sensor is to mount and how it fits the test rig. Correct electrical and mechanical interfaces reduce mounting errors and speed up the overall calibration process.
2.1 Metal can vs surface-mount: pros and cons
Metal can packages usually win for interference immunity and thermal stability and allow a straightforward pressure access hole; surface-mount parts are easier to install in volume and integrate into a digital measurement chain. Choose the format that suits your bench space and protection needs, and make sure the mounting won’t introduce mechanical stress or leakage.
3. Calibration methods and step-by-step procedures
Start with a baseline: confirm the reference sensor’s factory calibration and valid temperature band, then establish a stable pressure condition between the device under test and the reference. It’s best to run both static point calibrations and dynamic response checks: static points verify linearity and zero-offset, dynamic tests probe bandwidth and transient response. Record raw readings and corrected values at every stage to support future audits and quality tracking.
3.1 Static points and dynamic verification
Static calibration covers several points from low to high to confirm linearity and bias; dynamic verification applies step or sinusoidal stimuli to test response bandwidth and lag. A low-error reference sensor makes it straightforward to spot differences in performance during transients or steady state and to decide on the right adjustments.
4. Data acquisition, processing and automation strategies
Modern calibration workflows increasingly use digital pressure sensors and automated data capture. High-integration sensor subsystems—combining amplifiers, ADCs, DSP and digital interfaces—deliver high-resolution data streams and offer configurable filtering and notch filters to cut power-line noise. Automation reduces manual transcription errors and improves the auditability and consistency of calibration records.
4.1 Digital interfaces and filter settings
Fitting appropriate bandwidth filters and a 50/60 Hz notch filter in the data path markedly improves signal-to-noise. Choose bandwidth to balance response speed and noise suppression: wider bandwidth catches fast changes; narrower bandwidth reduces random noise. The right settings yield data that’s both accurate and stable for analysis and decision-making.
5. Verification, quality assurance and common troubleshooting
After calibration, run verification steps to ensure adjustments hold under normal conditions. Typical issues include zero drift, fitting leaks, improper temperature compensation and incorrect digital filter settings. Put in place a regular verification schedule, re-test critical points with a high-precision sensor, and keep full raw data and correction logs. Those practices keep deviations within acceptable limits and extend equipment service life.
5.1 Routine checks and re-calibration planning
Set re-calibration intervals based on usage and criticality, and add short daily checks—zero checks and simple step response tests—to catch drift early. Keeping environmental logs (temperature, humidity, power conditions) helps with root-cause analysis and traceability.
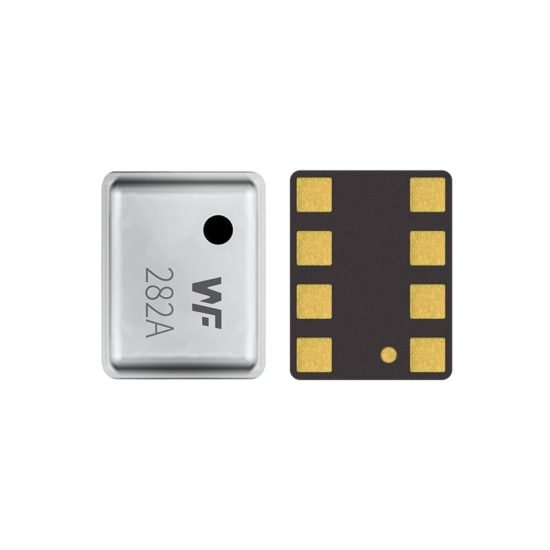
Pressure sensor subsystem used in lab equipment
The uploaded image shows a high-precision pressure sensor similar to WF282A: a metal top cover with a pressure port and an LGA pad layout for soldering. These devices typically combine a precision piezoresistive sensing element with an amplifier, ADC, DSP and a digital interface. They tend to offer 16-bit resolution, configurable bandwidth from 1–200 Hz and a 50/60 Hz notch filter option. Factory multi-point calibration (up to seven points) and low non-linearity (industry-leading around 0.5% FSS) make them well suited for high-accuracy calibration tasks. Using such a sensor subsystem as the reference can noticeably improve calibration speed and result stability.
Conclusión
Using high-precision pressure sensors to calibrate lab equipment is a practical, high-value approach. Right selection, a clear calibration sequence, reliable data capture and robust verification reduce measurement error and raise data confidence. Integrating advanced pressure sensors—those with low noise, stable zero, factory multi-point calibration and digital interfaces—shortens calibration cycles and improves long-term consistency. Finally, a defined verification and re-calibration plan for critical gear is the last line of defence for measurement quality.
La introducción anterior sólo toca la superficie de las aplicaciones de la tecnología de sensores de presión. Continuaremos explorando los diferentes tipos de elementos sensores utilizados en diversos productos, cómo funcionan y sus ventajas y desventajas. Si desea obtener más detalles sobre lo que se analiza aquí, puede consultar el contenido relacionado más adelante en esta guía. Si tiene poco tiempo, también puede hacer clic aquí para descargar los detalles de estas guías. Producto del sensor de presión de aire datos PDF.
Para obtener más información sobre otras tecnologías de sensores, por favor Visite nuestra página de sensores.
